<?xml version="1.0" encoding="UTF-8"?>
<feed xmlns="http://www.w3.org/2005/Atom" xml:lang="en-US">
                        <id>https://hofmannsven.com/feed</id>
                                <link href="https://hofmannsven.com/feed" rel="self"></link>
                                <title><![CDATA[Sven Hofmann]]></title>
                    
                                <subtitle>Thoughts, resources, and hacks for developers.</subtitle>
                                                    <updated>2021-03-24T15:04:10+01:00</updated>
                        <entry>
            <title><![CDATA[How to implement a custom Faker Provider in Laravel]]></title>
            <link rel="alternate" href="https://hofmannsven.com/2021/faker-provider-in-laravel" />
            <id>https://hofmannsven.com/2021/faker-provider-in-laravel</id>
            <author>
                <name><![CDATA[Sven Hofmann]]></name>
            </author>
            <summary type="html">
                <![CDATA[<p><a href="https://github.com/fakerphp/Faker">Faker PHP</a> is a library that generates random and anonymized data for testing or to bootstrap an application.</p>
<p>Faker already provides a lot of generator properties, so-called <em>formatters</em>, out of the box. You can find a list of the <a href="https://fakerphp.github.io/formatters/#available-formatters">available formatters</a> in the official documentation.</p>
<p>But what if no formatter aligns with the business logic? In this case, you can register your custom provider to the existing ones. Here's how to do it in Laravel:</p>
<h2><a id="ref-extending-the-base" href="#ref-extending-the-base" class="heading-permalink" aria-hidden="true" title="Anchor"></a>Extending the Base</h2>
<p>As a simplified example, let's implement a formatter that returns the name of a PHP framework.</p>
<p>A custom provider usually extends the <code>\Faker\Provider\Base</code> class.
Therefore, in your Laravel application, create a new class that returns the data:</p>
<div class="code-group">
<div class="code-block">
<span class="filename" role="complementary">app/Faker/FrameworkProvider.php</span>
<pre><code class="language-php">namespace App\Faker;
use Faker\Provider\Base;
</code></pre>
</div>
<div class="code-block sep">
<pre><code class="language-php">class FrameworkProvider extends Base
{
    protected static $names = [
        'CakePHP',
        'CodeIgniter',
        'Laravel',
        'Lumen',
        'Phalcon',
        'Slim',
        'Symfony',
    ];
    public function framework(): string
    {
        return static::randomElement(static::$names);
    }
}
</code></pre>
</div>
</div>
<p>Laravel autoloads the file via Composer. Faker will later use the method name as the name of the formatter. The method returns a random element from a given array of strings.</p>
<h2><a id="ref-extending-the-service-provider" href="#ref-extending-the-service-provider" class="heading-permalink" aria-hidden="true" title="Anchor"></a>Extending the Service Provider</h2>
<p>Next, register the class in Laravel. You can generate a new Laravel service provider via the artisan command:</p>
<div class="code-group">
<div class="code-block">
<pre><code class="language-bash">php artisan make:provider FakerServiceProvider
</code></pre>
</div>
</div>
<p>Make sure to include the additional Laravel service provider in the config file:</p>
<div class="code-group">
<div class="code-block">
<span class="filename" role="complementary">config/app.php</span>
<pre><code class="language-php">'providers' => [
    App\Providers\FakerServiceProvider::class,
],
</code></pre>
</div>
</div>
<p>In the provider, use the <code>register()</code> method to bind into the service container:</p>
<div class="code-group">
<div class="code-block">
<span class="filename" role="complementary">app/Providers/FakerServiceProvider.php</span>
<pre><code class="language-php">use App\Faker\FrameworkProvider;
use Faker\{Factory, Generator};
use Illuminate\Support\ServiceProvider;
</code></pre>
</div>
<div class="code-block sep">
<pre><code class="language-php">class FakerServiceProvider extends ServiceProvider
{
    public function register(): void
    {
        $this->app->singleton(Generator::class, function () {
            $faker = Factory::create();
            $faker->addProvider(new FrameworkProvider($faker));
            return $faker;
        });
    }
}
</code></pre>
</div>
</div>
<p><code>Factory::create()</code> creates a Faker generator bundled with the default providers where you can attach additional providers using the <code>addProvider()</code> method.</p>
<h2><a id="ref-usage-in-factories-and-tests" href="#ref-usage-in-factories-and-tests" class="heading-permalink" aria-hidden="true" title="Anchor"></a>Usage in Factories and Tests</h2>
<p>Now you can use the new formatter like the other Faker formatters. In a Laravel factory, the syntax for the custom formatter looks like this:</p>
<div class="code-group">
<div class="code-block">
<pre><code class="language-php">public function definition(): array
{
    return [
        'name' => $this->faker->framework,
    ];
}
</code></pre>
</div>
</div>
<p>A test could look like this:</p>
<div class="code-group">
<div class="code-block">
<span class="filename" role="complementary">FrameworkProviderTest.php</span>
<pre><code class="language-php">use WithFaker;
</code></pre>
</div>
<div class="code-block sep">
<pre><code class="language-php">/** @test */
public function it_matches_any_word(): void
{
    $this->assertMatchesRegularExpression('/\w+/', $this->faker->framework);
}
</code></pre>
</div>
</div>
<p>You can use the formatter in your factories and tests. Keep in mind that <code>fakerphp/faker</code> is a dev dependency in Laravel, which is only available in the development environment.</p>
<h2><a id="ref-summary" href="#ref-summary" class="heading-permalink" aria-hidden="true" title="Anchor"></a>Summary</h2>
<p>Adding custom formatters is a great way to keep test factories short and concise to read whenever you need to generate data that Faker does not represent per default. There are a lot of helpful <a href="https://fakerphp.github.io/third-party/">third-party packages</a> available. I especially like the <a href="https://github.com/aalaap/faker-youtube">YouTube URLs</a> package and the package for <a href="https://github.com/bluemmb/Faker-PicsumPhotos">image placeholders</a>.</p>
]]>
            </summary>
                                    <updated>2021-03-24T15:04:10+01:00</updated>
        </entry>
            <entry>
            <title><![CDATA[Getting started with Corcel]]></title>
            <link rel="alternate" href="https://hofmannsven.com/2021/corcel" />
            <id>https://hofmannsven.com/2021/corcel</id>
            <author>
                <name><![CDATA[Sven Hofmann]]></name>
            </author>
            <summary type="html">
                <![CDATA[<p>In this post, I'm using <a href="https://github.com/corcel/corcel">Corcel</a> to create a simple blog as a part of a Laravel application with WordPress as the <abbr title="Content Management System">CMS</abbr>. This setup makes it possible to manage your posts within the WordPress admin interface while using a Laravel application and Corcel to query and render the content.</p>
<h2><a id="ref-installing-corcel-in-a-laravel-project" href="#ref-installing-corcel-in-a-laravel-project" class="heading-permalink" aria-hidden="true" title="Anchor"></a>Installing Corcel in a Laravel project</h2>
<p>Require the <a href="https://github.com/corcel/corcel/releases/tag/v5.0.0">latest version of Corcel</a> via Composer:</p>
<div class="code-group">
<div class="code-block">
<pre><code class="language-bash">composer require jgrossi/corcel
</code></pre>
</div>
</div>
<p>And publish the Corcel configuration file:</p>
<div class="code-group">
<div class="code-block">
<pre><code class="language-bash">php artisan vendor:publish --provider="Corcel\Laravel\CorcelServiceProvider"
</code></pre>
</div>
</div>
<p>You can customize the name of the database connection in the configuration file:</p>
<div class="code-group">
<div class="code-block">
<span class="filename" role="complementary">config/corcel.php</span>
<pre><code class="language-php">'connection' => 'wordpress',
</code></pre>
</div>
</div>
<p>Add the additional database connection to the <code>connections[]</code> in your database configuration file:</p>
<div class="code-group">
<div class="code-block">
<span class="filename" role="complementary">config/database.php</span>
<pre><code class="language-php">'wordpress' => [
    'driver'    => 'mysql',
    'host'      => env('WP_DB_HOST', '127.0.0.1'),
    'database'  => env('WP_DB_DATABASE', 'forge'),
    'username'  => env('WP_DB_USERNAME', 'forge'),
    'password'  => env('WP_DB_PASSWORD', ''),
    'charset'   => 'utf8',
    'collation' => 'utf8_unicode_ci',
    'prefix'    => env('WP_DB_PREFIX', 'wp_'),
    'strict'    => false,
    'engine'    => null,
],
</code></pre>
</div>
</div>
<p>Make sure to define the environment variables <code>WP_DB_HOST</code>, <code>WP_DB_DATABASE</code>, <code>WP_DB_USERNAME</code>, <code>WP_DB_PASSWORD</code>, <code>WP_DB_PREFIX</code> in your <code>.env</code> file.</p>
<h2><a id="ref-usage" href="#ref-usage" class="heading-permalink" aria-hidden="true" title="Anchor"></a>Usage</h2>
<p>Let's start making use of Corcel by building a simple blog based on the WordPress database. Following the logic of WordPress, the blog consists of individual posts.</p>
<p>The first step is to create a <code>Post</code> model which extends <code>Corcel\Model\Post</code>. This step is optional but provides extra flexibility once you need to add custom methods for example <a href="https://laravel-news.com/clean-up-your-laravel-models-with-view-presenters">view presenters</a>. You can also use <code>Corcel\Model\Post</code> directly.</p>
<div class="code-group">
<div class="code-block">
<pre><code class="language-bash">php artisan make:model Post
</code></pre>
</div>
</div>
<div class="code-group">
<div class="code-block">
<span class="filename" role="complementary">app/Models/Post.php</span>
<pre><code class="language-php">use Corcel\Model\Post as Corcel;
</code></pre>
</div>
<div class="code-block sep">
<pre><code class="language-php">class Post extends Corcel
{
    protected $postType = 'post';
}
</code></pre>
</div>
</div>
<p>Next, create the corresponding <code>PostsController</code>:</p>
<div class="code-group">
<div class="code-block">
<pre><code class="language-bash">php artisan make:controller PostsController
</code></pre>
</div>
</div>
<p>Corcel is built on top of the <a href="https://laravel.com/docs/master/eloquent">Laravel Eloquent</a> <abbr title="Object-Relational Mapper">ORM</abbr> to interacting with the database. In the <code>index()</code> method, get the newest five public posts from the WordPress database and paginate the results using Eloquents <code>paginate()</code> method. In the <code>show()</code> method get the post from the <code>$slug</code>:</p>
<div class="code-group">
<div class="code-block">
<span class="filename" role="complementary">app/Http/Controllers/PostsController.php</span>
<pre><code class="language-php">use App\Models\Post;
use Illuminate\Contracts\View\View;
</code></pre>
</div>
<div class="code-block sep">
<pre><code class="language-php">public function index(): View
{
    return view('posts.index', [
        'posts' => Post::published()->newest()->paginate(5),
    ]);
}
</code></pre>
</div>
<div class="code-block sep">
<pre><code class="language-php">public function show(string $slug): View
{
    return view('posts.show', [
        'post' => Post::slug($slug)->status('publish')->firstOrFail(),
    ]);
}
</code></pre>
</div>
</div>
<p>To access the view, let's add the routes for the blog overview and the single blog posts in the routes file referencing the methods in the <code>PostsController</code>:</p>
<div class="code-group">
<div class="code-block">
<span class="filename" role="complementary">routes/web.php</span>
<pre><code class="language-php">use App\Http\Controllers\PostsController;
use Illuminate\Support\Facades\Route;
</code></pre>
</div>
<div class="code-block sep">
<pre><code class="language-php">Route::get('/blog', [PostsController::class, 'index'])->name('posts.index');
Route::get('/blog/{post:slug}', [PostsController::class, 'show'])->name('posts.show');
</code></pre>
</div>
</div>
<p>In the <a href="https://laravel.com/docs/master/blade">Laravel Blade</a> front-end template for the index view, loop through the list of posts and display the pagination links using the <code>links()</code> method:</p>
<div class="code-group">
<div class="code-block">
<span class="filename" role="complementary">resources/views/posts/index.blade.php</span>
<pre><code class="language-html">@foreach($posts as $post)
  &lt;a href="{{ route('posts.show', $post ) }}">
    {{ $post->post_title }}
  &lt;/a>
@endforeach
</code></pre>
</div>
<div class="code-block sep">
<pre><code class="language-html">{{ $posts->links() }}
</code></pre>
</div>
</div>
<h2><a id="ref-use-cases" href="#ref-use-cases" class="heading-permalink" aria-hidden="true" title="Anchor"></a>Use Cases</h2>
<p>WordPress is a widely used CMS. As a developer, you may find it helpful to use built-in and well-tested features (uploads, comments) in addition to the far-ranging ecosystem (page builder, custom fields) without losing the flexibility of a PHP framework like Laravel.</p>
<p>Corcel supports all WordPress post types, including author, taxonomies, attachments, comments, options, users, and even <a href="https://github.com/tbruckmaier/corcel-acf">Advanced Custom Fields</a>. Corcel is a full-featured solution to use WordPress as your content management system in the background.</p>
<p>The best part is, this approach also works backward: You can update the WordPress database every time something happens in your application!</p>
<hr class="small" />
<h2><a id="ref-headless-wordpress" href="#ref-headless-wordpress" class="heading-permalink" aria-hidden="true" title="Anchor"></a>Headless WordPress</h2>
<p>If you are using WordPress as a decoupled or headless CMS, I recommend the WordPress plugin <a href="https://github.com/Shelob9/headless-mode">Headless Mode</a>.
The plugin blocks all requests to the WordPress site if the request is not part of a CRON, REST, GraphQL, or admin request (logged-in user). With the plugin installed, you can still use the <code>wp-admin</code> part of WordPress and entirely disable (redirect) the front-end requests.</p>
<h3><a id="ref-how-do-i-use-headless-mode" href="#ref-how-do-i-use-headless-mode" class="heading-permalink" aria-hidden="true" title="Anchor"></a>How do I use Headless Mode?</h3>
<p>Activate the plugin and add the constant <code>HEADLESS_MODE_CLIENT_URL</code> to your <code>wp-config.php</code> file. If the (logged-in) user doesn't have the capability of <code>edit_posts</code> a redirect happens:</p>
<div class="code-group">
<div class="code-block">
<span class="filename" role="complementary">wp-config.php</span>
<pre><code class="language-php">define('HEADLESS_MODE_CLIENT_URL', 'https://hofmannsven.com');
</code></pre>
</div>
</div>
<h3><a id="ref-how-can-i-entirely-disable-the-wordpress-front-end" href="#ref-how-can-i-entirely-disable-the-wordpress-front-end" class="heading-permalink" aria-hidden="true" title="Anchor"></a>How can I entirely disable the WordPress front-end?</h3>
<p>To also redirect logged-in users, return <code>true</code> in the filter. The setting disables the front-end entirely and redirects all users:</p>
<div class="code-group">
<div class="code-block">
<span class="filename" role="complementary">functions.php</span>
<pre><code class="language-php">add_filter('headless_mode_disable_front_end', '__return_true');
</code></pre>
</div>
</div>
<h3><a id="ref-how-do-i-handle-wordpress-file-uploads" href="#ref-how-do-i-handle-wordpress-file-uploads" class="heading-permalink" aria-hidden="true" title="Anchor"></a>How do I handle WordPress file uploads?</h3>
<p>WordPress is storing the absolute path in the database. To not leak the URL of your CMS, use a subdomain or <abbr title="Content Delivery Network ">CDN</abbr> for your uploads.</p>
<p>You can change the upload path using the <a href="https://developer.wordpress.org/reference/hooks/pre_option_option/"><code>pre_option_{$option}</code></a> hook. Links to images and attachments inside of the <code>$post-&gt;post_content</code> are now served from the subdomain or CDN:</p>
<div class="code-group">
<div class="code-block">
<span class="filename" role="complementary">functions.php</span>
<pre><code class="language-php">add_filter('pre_option_upload_path', function($upload_path) {
    return '/path/to/your/uploads';
});
</code></pre>
</div>
<div class="code-block sep">
<pre><code class="language-php">add_filter('pre_option_upload_url_path', function($upload_url_path) {
    return 'https://cdn.hofmannsven.com';
});
</code></pre>
</div>
</div>
]]>
            </summary>
                                    <updated>2021-02-27T15:04:10+01:00</updated>
        </entry>
            <entry>
            <title><![CDATA[Testing Laravel Form Requests]]></title>
            <link rel="alternate" href="https://hofmannsven.com/2020/testing-laravel-form-requests" />
            <id>https://hofmannsven.com/2020/testing-laravel-form-requests</id>
            <author>
                <name><![CDATA[Sven Hofmann]]></name>
            </author>
            <summary type="html">
                <![CDATA[<p>We start with a test for the controller of a sample JSON API. Therefore, we scaffold a new integration test using the Artisan <code>make:test</code> CLI command.
The test will be in the <code>tests</code> directory of the Laravel application and mirror the architecture of the main application.</p>
<div class="code-group">
<div class="code-block">
<pre><code class="language-bash">php artisan make:test Http/Controllers/Api/UsersControllerTest
</code></pre>
</div>
</div>
<p>We are going to use a (slightly modified) example from the section <a href="https://laravel.com/docs/7.x/http-tests#testing-json-apis">Testing JSON APIs</a> from the Laravel documentation:</p>
<div class="code-group">
<div class="code-block">
<span class="filename" role="complementary">UsersControllerTest.php</span>
<pre><code class="language-php">use WithFaker;
</code></pre>
</div>
<div class="code-block sep">
<pre><code class="language-php">/** @test */
public function a_user_can_create_a_new_user()
{
    $user = factory(User::class)->make();
    $response = $this
        ->actingAs($user)
        ->postJson(route('api.user.store'), [
            'name' => $this->faker->name,
            'email' => $this->faker->safeEmail,
        ]);
    $response
        ->assertStatus(201)
        ->assertJson([
            'created' => true,
        ]);
}
</code></pre>
</div>
</div>
<p>In this test, we act as an authenticated user to send an HTTP <code>POST</code> request to the JSON API endpoint.
In the response, we assert the returned HTTP status as well as the returned JSON data.</p>
<p>This test covers the <em>happy path</em>. This means we send valid data (including a user, a name, and an email address) and therefore receive a valid response.
This test does not cover the validation of the attributes, like an empty name, or a malformed email address.</p>
<h2><a id="ref-form-request-validation" href="#ref-form-request-validation" class="heading-permalink" aria-hidden="true" title="Anchor"></a>Form Request Validation</h2>
<p>Validation has its own place in Laravel know as <a href="https://laravel.com/docs/7.x/validation#form-request-validation">form request validation</a>.</p>
<p>Again, we stick to the example from the documentation and create a form request class, using the Artisan <code>make:request</code> CLI command:</p>
<div class="code-group">
<div class="code-block">
<pre><code class="language-bash">php artisan make:request StoreUser
</code></pre>
</div>
</div>
<p>The <code>authorize()</code> method checks that only authenticated users are authorized to make the request.</p>
<p>The <code>rules()</code> method of the form request object is the place where we can set up all the validation rules for the API controller:</p>
<div class="code-group">
<div class="code-block">
<span class="filename" role="complementary">StoreUser.php</span>
<pre><code class="language-php">public function authorize(): bool
{
    return Auth::check();
}
</code></pre>
</div>
<div class="code-block sep">
<pre><code class="language-php">public function rules(): array
{
    return [
        'name' => ['required', 'max:255'],
        'email' => ['required', 'unique:users,email', 'email:rfc,dns'],
    ];
}
</code></pre>
</div>
</div>
<p>Now it's time to take a closer look at the controller. We utilize the Artisan <code>make:controller</code> CLI command to scaffold the API controller:</p>
<div class="code-group">
<div class="code-block">
<pre><code class="language-bash">php artisan make:controller Api/UsersController
</code></pre>
</div>
</div>
<p>We can now type-hint the form request in the API controller action and apply the rules defined in the form request object:</p>
<div class="code-group">
<div class="code-block">
<span class="filename" role="complementary">UsersController.php</span>
<pre><code class="language-php">public function store(StoreUser $request): JsonResponse
{
    // Handle the valid request.
    $validated = $request->validated();
    // &hellip;
    return response()
        ->json([
            'created' => true,
        ], 201);
}
</code></pre>
</div>
</div>
<p>The incoming <code>$request</code> will be validated against the rules provided in the <code>StoreUser</code> class.</p>
<p>If the validation fails, the user will be redirected back.
If the request is an AJAX request, an HTTP response with the status code <code>422</code> will be returned including all the validation errors.</p>
<p>With the validation being separated from the controller (in its own form request class), how can we make sure the controller method uses the appropriate form request validation?</p>
<h3><a id="ref-testing-form-requests" href="#ref-testing-form-requests" class="heading-permalink" aria-hidden="true" title="Anchor"></a>Testing Form Requests</h3>
<p>It turns out <a href="https://twitter.com/gonedark">Jason McCreary</a>, the creator of <a href="https://laravelshift.com/">Laravel Shift</a>, has built a neat package to solve this issue. The <a href="https://github.com/jasonmccreary/laravel-test-assertions">Laravel Test Assertions</a> package provides a set of helpful assertions when testing Laravel applications.</p>
<p>Let's install the package (currently <a href="https://github.com/jasonmccreary/laravel-test-assertions/releases/tag/v1.0.0">v1.0.0</a>) and give it a try:</p>
<div class="code-group">
<div class="code-block">
<pre><code class="language-sh">composer require --dev jasonmccreary/laravel-test-assertions
</code></pre>
</div>
</div>
<p>We add the trait <code>AdditionalAssertions</code> at the beginning of the test and can now assert that the action for a given controller is linked to the appropriate form request object:</p>
<div class="code-group">
<div class="code-block">
<span class="filename" role="complementary">UsersControllerTest.php</span>
<pre><code class="language-php">use AdditionalAssertions;
</code></pre>
</div>
<div class="code-block sep">
<pre><code class="language-php">/** @test */
public function store_uses_form_request()
{
    $this->assertActionUsesFormRequest(
        UsersController::class,
        'store',
        StoreUser::class
    );
}
</code></pre>
</div>
</div>
<p>This test gives us confidence that the controller uses the associated form request. We can now be sure the controller action performs the expected validations.</p>
<p>Please note that we do not test the validation rules here! The test only makes sure that the controller uses the form request.</p>
<h3><a id="ref-testing-form-request-validation-rules" href="#ref-testing-form-request-validation-rules" class="heading-permalink" aria-hidden="true" title="Anchor"></a>Testing Form Request Validation Rules</h3>
<p>While we do not need to test the rules provided by Laravel, we still want to make sure the rules are in place.
Let's write another test for the form request:</p>
<div class="code-group">
<div class="code-block">
<pre><code class="language-bash">php artisan make:test Http/Requests/StoreUserTest
</code></pre>
</div>
</div>
<p>The <a href="https://github.com/jasonmccreary/laravel-test-assertions">Laravel Test Assertions</a> package offers an assertion to quickly test if the validation rules match:</p>
<div class="code-group">
<div class="code-block">
<span class="filename" role="complementary">StoreUserTest.php</span>
<pre><code class="language-php">use AdditionalAssertions;
</code></pre>
</div>
<div class="code-block sep">
<pre><code class="language-php">/** @test */
public function it_verifies_validation_rules()
{
    $formRequest = new StoreUser();
    $this->assertExactValidationRules([
        'name' => ['required', 'max:255'],
        'email' => ['required', 'unique:users,email', 'email:rfc,dns'],
    ], $formRequest->rules());
}
</code></pre>
</div>
</div>
<p>Of course, this test might seem a little brittle on the first look. The test is going to fail as soon as the rules, or the fields are changing.
However, changing the rules or the fields should always result in a failing test!</p>
<p>Further reading: Jason McCreary wrote about the <em>real tradeoffs</em> in his post <a href="https://jasonmccreary.me/articles/test-validation-laravel-form-request-assertion/">Testing validation in Laravel by asserting a form request</a>.</p>
<h3><a id="ref-testing-form-request-authorization" href="#ref-testing-form-request-authorization" class="heading-permalink" aria-hidden="true" title="Anchor"></a>Testing Form Request Authorization</h3>
<p>The <code>authorize()</code> method in the form request determines if the incoming request is an authorized request.
We can (and should!) test this behavior as well:</p>
<div class="code-group">
<div class="code-block">
<span class="filename" role="complementary">StoreUserTest.php</span>
<pre><code class="language-php">/** @test */
public function it_verifies_authorized()
{
    $user = factory(User::class)->make();
    $this->actingAs($user);
    $formRequest = new StoreUser();
    $this->assertTrue($formRequest->authorize());
}
</code></pre>
</div>
</div>
<p>In the test, we act as an authenticated user and new up the form request. We perform the assertion against the returned value of the <code>authorize()</code> method.
This test gives us confidence that we only allow authorized requests.</p>
<h2><a id="ref-writing-tests-takes-time" href="#ref-writing-tests-takes-time" class="heading-permalink" aria-hidden="true" title="Anchor"></a>Writing Tests Takes Time</h2>
<p>Laravel is built with testing in mind. Yet testing a controller method with a lot of fields can get out of hand quite fast.
The <a href="https://github.com/jasonmccreary/laravel-test-assertions">Laravel Test Assertions</a> package offers an option to quickly knock off the main points and gives us confidence that everything is wired up correctly.
With the basics covered we can focus on more complex parts of the application like custom validation rules or the business logic of the application.</p>
<blockquote>
<p>Keep testing until you have confidence.
<cite><a href="https://twitter.com/gonedark">Jason McCreary</a></cite></p>
</blockquote>
<p>Credits for this post are going to <a href="https://twitter.com/gonedark">Jason McCreary</a> for his awesome <a href="https://confidentlaravel.com/">Confident Laravel</a> course, a step-by-step guide to writing tests for Laravel applications.</p>
]]>
            </summary>
                                    <updated>2020-05-30T15:04:10+02:00</updated>
        </entry>
            <entry>
            <title><![CDATA[GitHub Actions and Laravel Nova]]></title>
            <link rel="alternate" href="https://hofmannsven.com/2020/github-actions-laravel-nova" />
            <id>https://hofmannsven.com/2020/github-actions-laravel-nova</id>
            <author>
                <name><![CDATA[Sven Hofmann]]></name>
            </author>
            <summary type="html">
                <![CDATA[<h2><a id="ref-getting-started-with-github-actions" href="#ref-getting-started-with-github-actions" class="heading-permalink" aria-hidden="true" title="Anchor"></a>Getting started with GitHub Actions</h2>
<p>GitHub rolled out <a href="https://github.com/features/actions">GitHub Actions</a> for everyone in November 2019. GitHub Actions are free to use (up to 2000 minutes per month) for public and private repositories and execute a workflow every time a defined event is triggered on GitHub. GitHub provides quite a lot of <a href="https://help.github.com/en/actions/automating-your-workflow-with-github-actions/events-that-trigger-workflows#webhook-events">webhook events</a> that can trigger a workflow.<br>
So let's explore how to automate the steps of our development workflow when working with Laravel and Laravel Nova.</p>
<h3><a id="ref-workflow-file" href="#ref-workflow-file" class="heading-permalink" aria-hidden="true" title="Anchor"></a>Workflow file</h3>
<p>To get started, you need to create the basic YAML configuration file. This file is located in the repository in the <code>.github/workflows</code> folder.</p>
<p><strong>TL;DR:</strong> View the whole workflow file on <a href="https://gist.github.com/hofmannsven/7ea03ec596d88ede45650037a25d47f7#file-ci-yml">GitHub</a>.</p>
<div class="code-group">
<div class="code-block">
<span class="filename" role="complementary">ci.yml</span>
<pre><code class="language-yml">name: Tests
on: [push]
jobs:
  tests:
    name: Run tests
    runs-on: ubuntu-latest
    steps:
      - uses: actions/checkout@v1
</code></pre>
</div>
</div>
<p>The keyword <code>on</code> defines when the action will be executed. In the example above, we listen for the <code>[push]</code> <a href="https://help.github.com/en/actions/automating-your-workflow-with-github-actions/events-that-trigger-workflows#webhook-events">event</a>. It is also possible to chain multiple events <code>[push, pull_request]</code> or <a href="https://help.github.com/en/actions/automating-your-workflow-with-github-actions/events-that-trigger-workflows#example-using-multiple-events-with-activity-types-or-configuration">restrict the workflow to a specific branch</a>.</p>
<p>The <code>jobs</code> section can hold multiple <code>steps</code>. The first step loads an action <code>actions/checkout@v1</code> provided by GitHub, imported with the keyword <code>uses</code>.</p>
<p>Workflows run on Linux, macOS, Windows, and even Docker container images. If you're interested in a setup with a custom Docker container image, read the post <a href="https://kirschbaumdevelopment.com/news-articles/using-github-actions-to-setup-ci-cd-with-laravel-and-mysql">Using Github Actions to setup CI/CD with Laravel</a> by Luis Dalmolin.</p>
<h3><a id="ref-services" href="#ref-services" class="heading-permalink" aria-hidden="true" title="Anchor"></a>Services</h3>
<p>Before adding additional steps to our workflow we want to include a service.</p>
<p>In most cases, Laravel Nova needs a database. For this reason, we're adding the MySQL service to the workflow. My application is still running on MySQL 5.7 so I'm pulling in the <a href="https://hub.docker.com/_/mysql">official MySQL Docker image</a> for MySQL 5.7 (the image also supports other tags like MySQL 8) that will spin up a MySQL server in the container. Make sure to define the <code>env</code> variables and the <code>port</code> as it will not work without these parameters!</p>
<div class="code-group">
<div class="code-block">
<span class="filename" role="complementary">ci.yml</span>
<pre><code class="language-yml">services:
  mysql:
    image: mysql:5.7
    env:
      MYSQL_DATABASE: database_ci
      MYSQL_USER: user
      MYSQL_PASSWORD: secret
      MYSQL_ROOT_PASSWORD: secretroot
    ports:
      - 33306:3306
    options: --health-cmd="mysqladmin ping" --health-interval=10s --health-timeout=5s --health-retries=3
</code></pre>
</div>
</div>
<p>To not confuse the environments I usually create a separate <code>.env</code> file for the CI environment. Based on the <code>.env.example</code> file create a new file with the name <code>.env.github</code> which is holding the MySQL credentials from above.<br>
You can also find the contents of the file on <a href="https://gist.github.com/hofmannsven/7ea03ec596d88ede45650037a25d47f7#file-env-github">GitHub</a>.</p>
<div class="code-group">
<div class="code-block">
<span class="filename" role="complementary">.env.github</span>
<pre><code class="language-env">DB_CONNECTION=mysql
DB_HOST=127.0.0.1
DB_PORT=33306
DB_DATABASE=database_ci
DB_USERNAME=user
DB_PASSWORD=secret
</code></pre>
</div>
</div>
<h4><a id="ref-verifying-the-mysql-connection" href="#ref-verifying-the-mysql-connection" class="heading-permalink" aria-hidden="true" title="Anchor"></a>Verifying the MySQL connection</h4>
<p>We're ready to add the first step. To make sure we've set up everything correctly we start with a step that tests if the MySQL connection is working. This step is optional and not related to the remaining workflow but I find it very helpful to make sure the MySQL connection is actually working.</p>
<div class="code-group">
<div class="code-block">
<span class="filename" role="complementary">ci.yml</span>
<pre><code class="language-yml">- name: Verify MySQL connection
  run: |
    mysql --version
    sudo apt-get install -y mysql-client
    mysql --host 127.0.0.1 --port ${{ job.services.mysql.ports['3306'] }} -uuser -psecret -e "SHOW DATABASES"
</code></pre>
</div>
</div>
<p>If you're having trouble setting up the MySQL connection jump to the <a href="#ref-troubleshooting">troubleshooting</a> section below.</p>
<h3><a id="ref-installing-dependencies" href="#ref-installing-dependencies" class="heading-permalink" aria-hidden="true" title="Anchor"></a>Installing dependencies</h3>
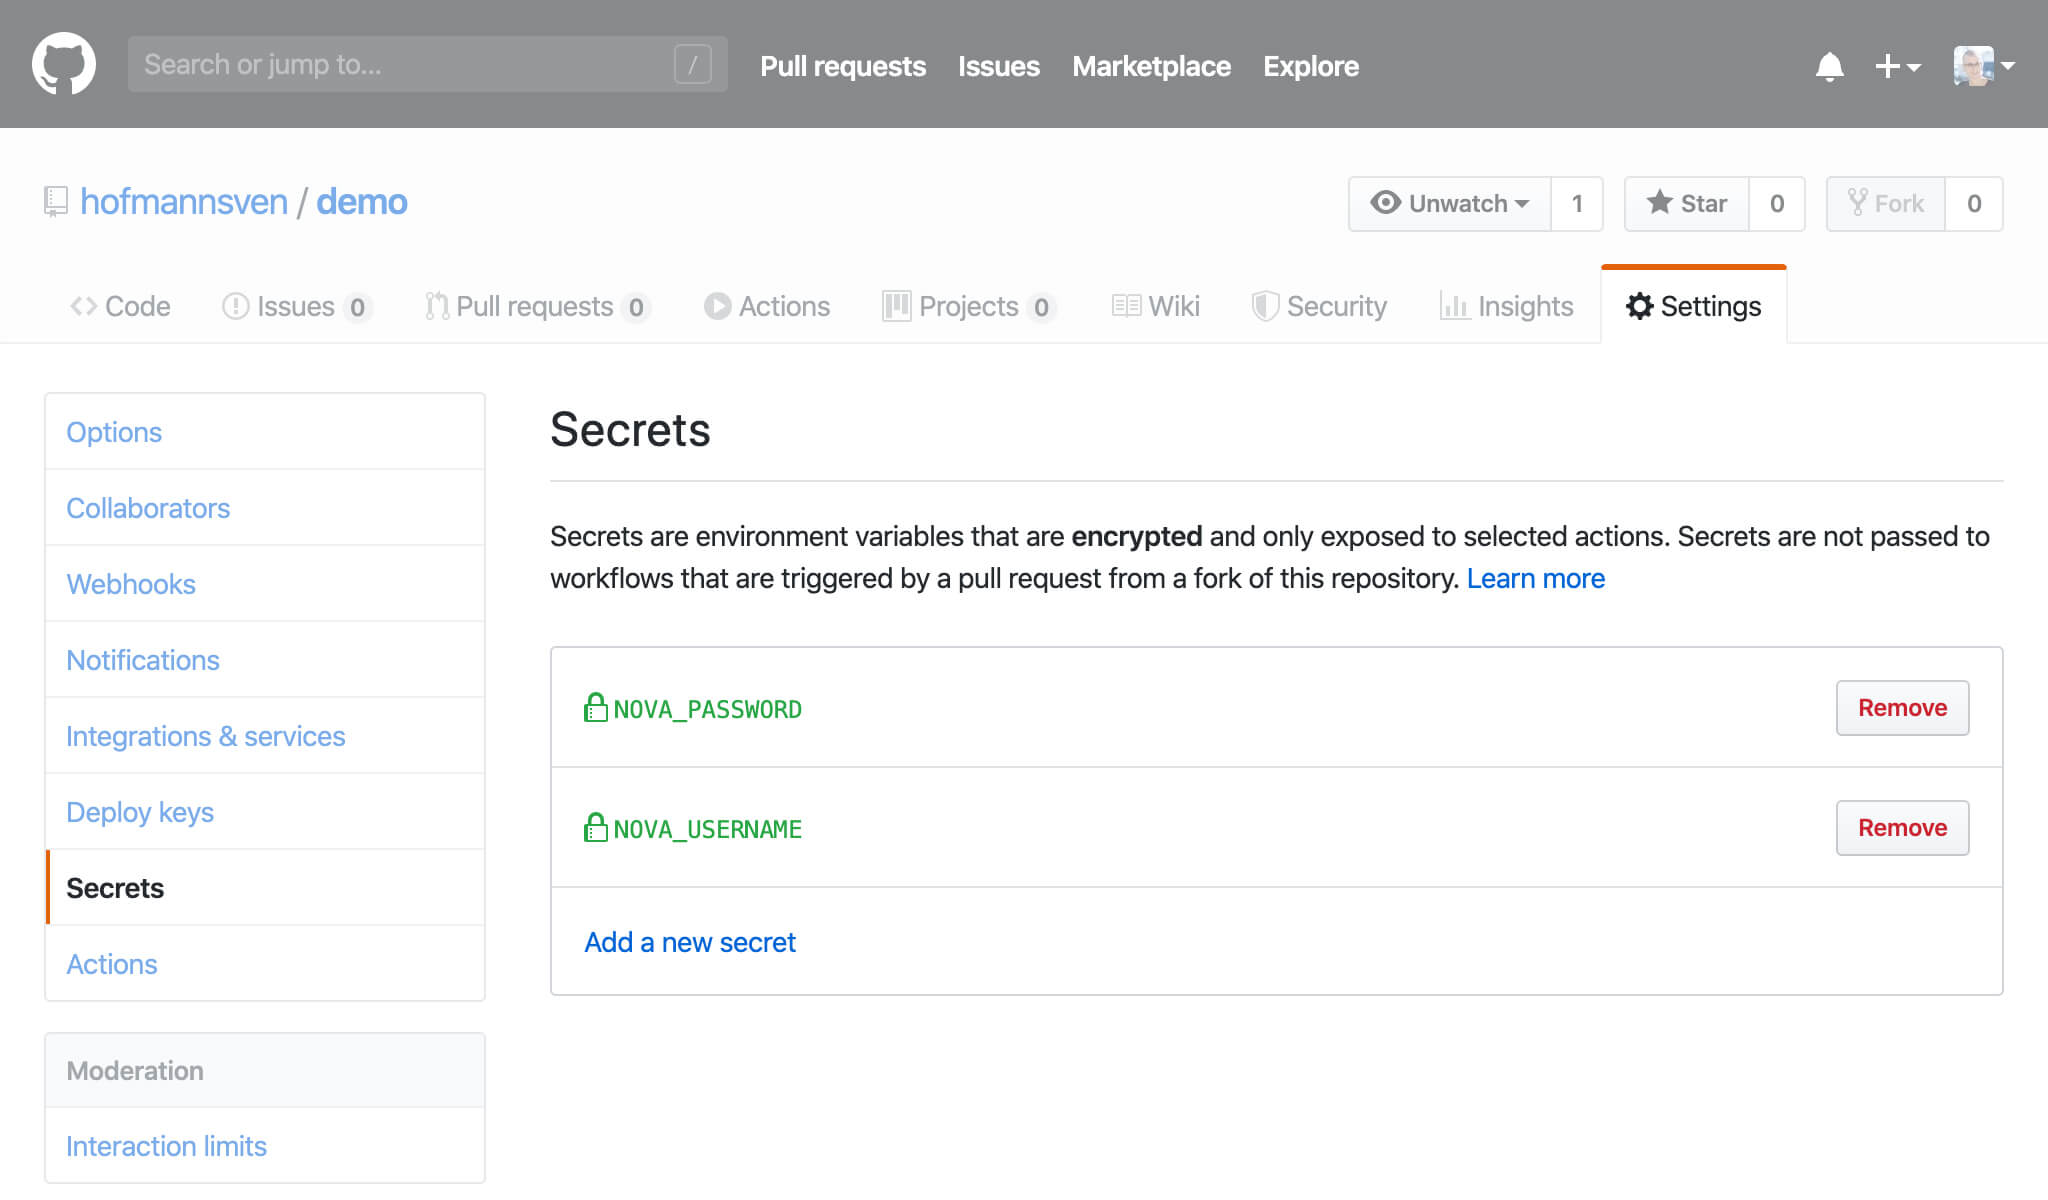
<p>Now we're good to go to set up the world of our application. In this step, we're going to download and install all of the required dependencies via Composer. To <a href="https://nova.laravel.com/docs/2.0/installation.html#authenticating-nova-in-continuous-integration-ci-environments">authenticate Nova in the GitHub CI environment</a> add your <code>NOVA_USERNAME</code> and <code>NOVA_PASSWORD</code> to the GitHub Secrets in the repository. The secrets are environment variables that are encrypted and not shared in forked repositories.<br>
You can set your secrets here: <em>GitHub Repository › Settings › Secrets</em></p>
<figure>
  <div class="browser">
    <img src="/storage/github-actions-laravel-nova/github-repository-secrets.jpg" alt="Screenshot of GitHub Repository Settings" />
  </div>  
  <figcaption>GitHub Repository › Settings › Secrets</figcaption>
</figure>
<div class="code-group">
<div class="code-block">
<span class="filename" role="complementary">ci.yml</span>
<pre><code class="language-yml">- name: Install dependencies
  run: |
    php --version
    composer config "http-basic.nova.laravel.com" "${{ secrets.NOVA_USERNAME }}" "${{ secrets.NOVA_PASSWORD }}"
    composer install -n --prefer-dist
</code></pre>
</div>
</div>
<h3><a id="ref-booting-laravel" href="#ref-booting-laravel" class="heading-permalink" aria-hidden="true" title="Anchor"></a>Booting Laravel</h3>
<p>Next, we're going to boot the main Laravel application including Laravel Nova and all other dependencies. Therefore, we copy our CI credentials from the <code>.env.github</code> file to the <code>.env</code> file. After generating an encryption key we can run other <code>artisan</code> commands.</p>
<div class="code-group">
<div class="code-block">
<span class="filename" role="complementary">ci.yml</span>
<pre><code class="language-yml">- name: Boot Laravel application
  run: |
    cp .env.github .env
    php artisan key:generate
    php artisan --version
</code></pre>
</div>
</div>
<h4><a id="ref-migrating-the-database" href="#ref-migrating-the-database" class="heading-permalink" aria-hidden="true" title="Anchor"></a>Migrating the database</h4>
<p>Run the available migrations to initiate the main structure of the database.
Append the <code>--seed</code> flag in case you'd like to seed the database with default entries e.g. roles or settings. The seed should not be necessary for your unit or feature tests, but may be helpful for other tests.</p>
<div class="code-group">
<div class="code-block">
<span class="filename" role="complementary">ci.yml</span>
<pre><code class="language-yml">- name: Migrate database
  run: |
    mysql --version
    php artisan migrate:fresh --seed
</code></pre>
</div>
</div>
<h3><a id="ref-running-the-build-process" href="#ref-running-the-build-process" class="heading-permalink" aria-hidden="true" title="Anchor"></a>Running the build process</h3>
<p>To make use of HTTP (feature) tests in our test suite we need to have a fully working application. This requires us to have access to all compiled assets in the CI environment. To compile the assets I'm using <code>yarn</code> but it works with <code>npm</code> as well.</p>
<div class="code-group">
<div class="code-block">
<span class="filename" role="complementary">ci.yml</span>
<pre><code class="language-yml">- name: Run yarn
  run: |
    yarn --version
    yarn && yarn dev
</code></pre>
</div>
</div>
<h3><a id="ref-running-the-test-suite" href="#ref-running-the-test-suite" class="heading-permalink" aria-hidden="true" title="Anchor"></a>Running the test suite</h3>
<p>Finally, we are ready to run the PHPUnit test suite:</p>
<div class="code-group">
<div class="code-block">
<span class="filename" role="complementary">ci.yml</span>
<pre><code class="language-yml">- name: Run tests
  run: |
    ./vendor/bin/phpunit --version
    ./vendor/bin/phpunit
</code></pre>
</div>
</div>
<p>Be aware of the two different environments:</p>
<ol>
<li>the CI environment: <code>ci</code><br>
defined in the <code>.env.github</code> file, copied to the <code>.env</code> file</li>
<li>the testing environment: <code>testing</code><br>
defined in the <code>phpunit.xml</code> file</li>
</ol>
<p>Laravel 6 uses an in-memory SQLite database for testing (config on <a href="https://gist.github.com/hofmannsven/7ea03ec596d88ede45650037a25d47f7#file-phpunit-xml-L31-L32">GitHub</a>).<br>
If you'd like to run your tests against a MySQL database, set the <code>DB_CONNECTION</code> to <code>mysql</code> and add the name of the database to <code>DB_DATABASE</code>. Make sure that the database actually exists and is empty.</p>
<p>If you're having trouble setting up the MySQL connection jump to the <a href="#ref-troubleshooting">troubleshooting</a> section below.</p>
<h3><a id="ref-adding-security-checks" href="#ref-adding-security-checks" class="heading-permalink" aria-hidden="true" title="Anchor"></a>Adding security checks</h3>
<p>To check if the application uses dependencies with known security vulnerabilities we load and run the open source <a href="https://security.symfony.com/">Symfony Security Checker</a>. I like this step in particular as it adds additional value to the automation workflow.</p>
<div class="code-group">
<div class="code-block">
<span class="filename" role="complementary">ci.yml</span>
<pre><code class="language-yml">- name: Run security checks
  run: |
    test -d security-checker || git clone https://github.com/sensiolabs/security-checker.git
    cd security-checker
    composer install
    php security-checker security:check ../composer.lock
</code></pre>
</div>
</div>
<h2><a id="ref-logs--caching" href="#ref-logs--caching" class="heading-permalink" aria-hidden="true" title="Anchor"></a>Logs &amp; Caching</h2>
<p>We can cache the dependencies from Composer and Yarn. Therefore we use the <code>actions/cache@v1</code> GitHub Action and a hash of the <code>.lock</code>-file as an identifier.</p>
<p>Ruben Van Assche covered these steps quite well in his post <a href="https://rubenvanassche.com/getting-started-with-github-actions/#running-yarn-">Getting started with GitHub Actions and Laravel</a> so I'm not going to illuminate these steps anymore. The steps are also included in the workflow file on <a href="https://gist.github.com/hofmannsven/7ea03ec596d88ede45650037a25d47f7#file-ci-yml">GitHub</a>.</p>
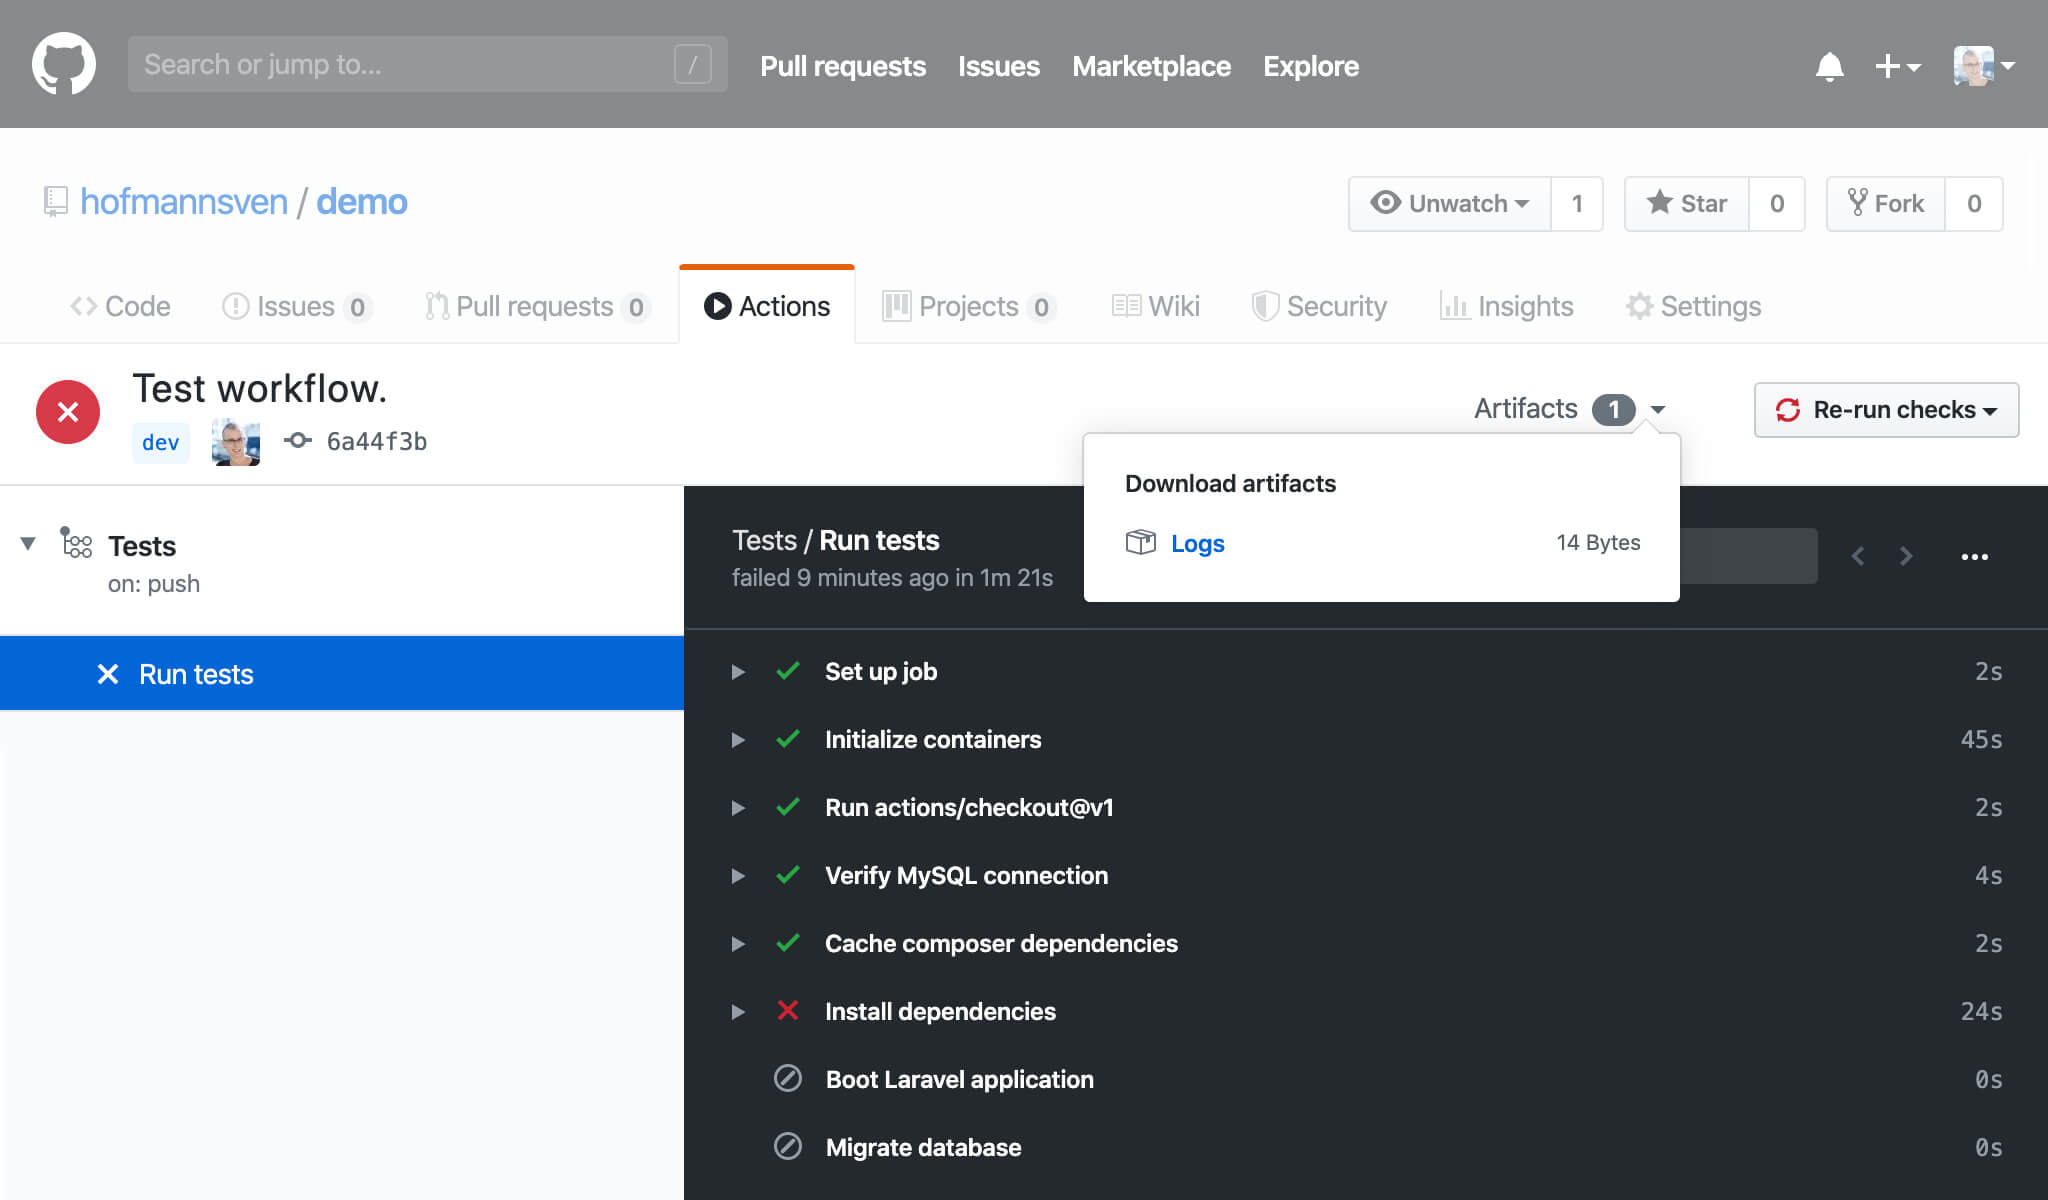
<p>In case of an application error, you can download the logfiles from GitHub.</p>
<figure>
  <div class="browser">
    <img src="/storage/github-actions-laravel-nova/github-actions-artifacts.jpg" alt="Screenshot of GitHub Actions Logs" />
  </div>
  <figcaption>Download the logfiles from failed actions</figcaption>
</figure>
<h2><a id="ref-running-the-complete-workflow" href="#ref-running-the-complete-workflow" class="heading-permalink" aria-hidden="true" title="Anchor"></a>Running the complete workflow</h2>
<p><strong>FYI:</strong> Download the workflow file from <a href="https://gist.github.com/hofmannsven/7ea03ec596d88ede45650037a25d47f7">GitHub</a>.</p>
<p>After we commit and push the workflow file to our repository on GitHub the action runs (see <code>on: [push]</code> above). Booting up the CI server including all dependencies and executing all the steps takes about two to three minutes (up to 2000 minutes per month are free which makes the CI service basically free to use).</p>
<p>Watch the workflow in action in the video below:</p>
<figure>
  <lite-youtube videoid="x6mnEaSXn9U"></lite-youtube>
  <figcaption>Running the GitHub Actions workflow</figcaption>
</figure>
<h2><a id="ref-troubleshooting" href="#ref-troubleshooting" class="heading-permalink" aria-hidden="true" title="Anchor"></a>Troubleshooting</h2>
<blockquote>
<p>Failed to initialize, mysql service is unhealthy.</p>
</blockquote>
<p>There is a problem with the MySQL port. If not defined, the port number is a random number. You can get the port number from the job service. Use the <code>env</code> key to assign the dynamic MySQL port number to a step manually.</p>
<div class="code-group">
<div class="code-block">
<span class="filename" role="complementary">ci.yml</span>
<pre><code class="language-yml">- name: Run tests
  run: ./vendor/bin/phpunit -v
  env:
    DB_PORT: ${{ job.services.mysql.ports['3306'] }}
</code></pre>
</div>
</div>
<hr class="small" />
<blockquote>
<p>SQLSTATE[HY000] [2002] php_network_getaddresses: getaddrinfo failed</p>
</blockquote>
<p>The MySQL credentials are incorrect. Make sure to define the <code>MYSQL_USER</code>, <code>MYSQL_PASSWORD</code> and <code>MYSQL_ROOT_PASSWORD</code> in your <code>.env</code> file.<br>
Read <a href="https://stackoverflow.com/a/30187838/1815847">this answer on Stack Overflow</a> for an in-depth explanation.</p>
<hr class="small" />
<blockquote>
<p>QueryException: SQLSTATE[HY000] [1045] Access denied for user 'user'@'localhost' (using password: YES)</p>
</blockquote>
<p>The database does not exist or the database credentials are invalid. Check the <code>.env</code> file and make sure to clear the config cache after a change:<br>
<code>php artisan config:clear</code></p>
<hr class="small" />
<blockquote>
<p>RuntimeException: No application encryption key has been specified.</p>
</blockquote>
<p>This error will pop up if the <code>APP_KEY</code> is not set. Make sure to generate an <code>APP_KEY</code> using the <code>php artisan key:generate</code> command <em>before</em> executing any commands using <code>artisan</code>.</p>
<hr class="small" />
<h2><a id="ref-where-to-go-from-here" href="#ref-where-to-go-from-here" class="heading-permalink" aria-hidden="true" title="Anchor"></a>Where to go from here?</h2>
<p>The future of automation is now. Explore the <a href="https://github.com/sdras/awesome-actions">awesome actions repository</a> and use the available actions to create a <a href="https://github.com/elgohr/Github-Release-Action">release</a>, send a <a href="https://github.com/sdras/awesome-actions#notifications-and-messages">notification</a> or run a <a href="https://github.com/sdras/awesome-actions#deployment">deployment</a>. Or even better: Create your own actions!</p>
<p><strong>Update:</strong> Freek Van der Herten shared and explained the GitHub workflow file for <a href="https://flareapp.io/ignition">Ignition</a> in his post <a href="https://freek.dev/1546-using-github-actions-to-run-the-tests-of-laravel-projects-and-packages">Using GitHub actions to run the tests of Laravel projects and packages</a> which contains a test matrix (<code>php</code>, <code>laravel</code>, <code>dependency-version</code> and <code>os</code>) as well as Slack notifications. Make sure to read the post as well!</p>
]]>
            </summary>
                                    <updated>2020-01-05T15:04:10+01:00</updated>
        </entry>
            <entry>
            <title><![CDATA[Motivation, Discipline, and Focus]]></title>
            <link rel="alternate" href="https://hofmannsven.com/2019/focus" />
            <id>https://hofmannsven.com/2019/focus</id>
            <author>
                <name><![CDATA[Sven Hofmann]]></name>
            </author>
            <summary type="html">
                <![CDATA[<p>When working as a freelance web developer it's important to get things done. I'm working 100% remote and I'm traveling a lot, which means that I'm constantly pulled away from work. This lifestyle is great for a healthy work-life-balance but I still need to make sure the job gets done.</p>
<p>When distractions are everywhere it's key to find joy in the work. To accomplish my tasks I aim for three things: motivation, discipline, and focus.</p>
<p>Fortunately, I'm very <strong>passionate about web development</strong> and really like what I'm doing. So most of the time motivation is not an issue for me.</p>
<p>But nobody is constantly motivated, particularly when working on side projects or open source projects over a longer period. When curiosity and excitement wear off, discipline keeps me going, even if I don't feel like it. Persistence and consistency are the gatekeepers.</p>
<h2><a id="ref-get-back-on-track" href="#ref-get-back-on-track" class="heading-permalink" aria-hidden="true" title="Anchor"></a>Get back on track</h2>
<p>Start by defining a small and manageable goal and commit to working on it. Start with an easy task and reach for the low hanging fruits, to celebrate a quick win. Making any kind of progress, however small, really helps me to get back on track and more often than not the motivation returns after a while.</p>
<p>In software development, I usually follow the <a href="https://hofmannsven.com/2019/commit-message-driven-development">Commit Message Driven Workflow</a> and start by writing out the commit message. With the commit message being written down (the goal), I'm in the mindset to write the code.</p>
<h2><a id="ref-priorities-are-key" href="#ref-priorities-are-key" class="heading-permalink" aria-hidden="true" title="Anchor"></a>Priorities are key</h2>
<p>Though, for me, <strong>the most important gatekeeper is focus</strong>. Without focus — without the right direction — there is no meaningful progress.</p>
<p>In his post <a href="https://blog.samaltman.com/how-to-be-successful">How to Be Successful</a>, entrepreneur Sam Altman wrote on the importance of focus:</p>
<blockquote>
<p>Focus is a force multiplier on work. Almost everyone I've ever met would be well-served by spending more time thinking about what to focus on. It is much more important to work on the right thing than it is to work many hours. Most people waste most of their time on stuff that doesn't matter.<br>
Once you have figured out what to do, be unstoppable about getting your small handful of priorities accomplished quickly. I have yet to meet a slow-moving person who is very successful.
<cite><a href="https://blog.samaltman.com/">samaltman.com</a>, <a href="https://blog.samaltman.com/how-to-be-successful">How to Be Successful</a></cite></p>
</blockquote>
<p>Focus is probably the most underrated gatekeeper. If your priorities are not clear — if you do not know what your goal is — it's hard to make any progress at all. Make sure to <a href="https://hofmannsven.com/now">be clear about what you are working on</a> and say no to everything else.</p>
<h2><a id="ref-conclusion" href="#ref-conclusion" class="heading-permalink" aria-hidden="true" title="Anchor"></a>Conclusion</h2>
<p>It's never been a better time for self-motivated people, wrote James Clear, the author of the book <a href="https://amzn.to/2ZLSpMc">Atomic Habits</a><i class="affiliate"></i>. To make progress you need to start. A lot of options reveal themselves after starting. Prioritize high-impact tasks. Define a goal. Remove distractions. Stay focused. Make it a habit to work on it every day. Find joy in the work. And from time to time, take a break.</p>
<hr class="small" />
<h3><a id="ref-further-reading" href="#ref-further-reading" class="heading-permalink" aria-hidden="true" title="Anchor"></a>Further reading</h3>
<ul>
<li>
<a href="https://zenhabits.net/enough-time/">Why We Never Have Enough Time &amp; What to Do About It</a>
</li>
<li>
<a href="https://markmanson.net/attention-diet">The Attention Diet</a>
</li>
<li>
<a href="https://amzn.to/2NZZK4j">Atomic Habits</a><i class="affiliate"></i>
</li>
</ul>
]]>
            </summary>
                                    <updated>2019-11-28T15:04:10+01:00</updated>
        </entry>
            <entry>
            <title><![CDATA[Commit Message Driven Development]]></title>
            <link rel="alternate" href="https://hofmannsven.com/2019/commit-message-driven-development" />
            <id>https://hofmannsven.com/2019/commit-message-driven-development</id>
            <author>
                <name><![CDATA[Sven Hofmann]]></name>
            </author>
            <summary type="html">
                <![CDATA[<p>The common process is writing the code and thinking about the commit message afterward. If you are like me, then the commit message sums up everything you remember working on while skimming through the staged files. This regularly results in commits that aren't logically grouped and everything is just messy enough to not be helpful in the long term. Commit messages like <em>WIP</em> or <em>Bugfixes and minor improvements</em> are known to be the result.</p>
<p>Shoutout to David Hemphill who has turned this antipattern into a disestablishmentarian philosophy. While there might be use cases where this makes sense I strongly believe in the value of <a href="https://chris.beams.io/posts/git-commit/">helpful commit messages</a>, especially when working in a team or an open-source repository.</p>
<h2><a id="ref-commit-message-driven-workflow" href="#ref-commit-message-driven-workflow" class="heading-permalink" aria-hidden="true" title="Anchor"></a>Commit Message Driven Workflow</h2>
<p>So how exactly would a commit message driven workflow look like? First, we start by writing out the commit message. Second, we write the code. As soon as we're done, we commit the code. This is how the workflow looks like:</p>
<ol>
<li>Write the commit message.</li>
<li>Write the code.</li>
<li>Commit the code.</li>
</ol>
<p>By writing the draft of the commit message first, we decide what we're working on. The scope of our task is clear now. With the commit message being written down, we're already in the process and in the mindset to write the code to make it happen. We can modify the commit message later, if necessary.</p>
<hr class="small" />
<p>I came across this idea some time ago. Andrew Feeney published the post <a href="https://andrewfeeney.me/articles/commit-message-driven-development">Commit Message Driven Development</a> and it completely changed my workflow as a professional developer.</p>
<p>This approach helps me to focus on the actual feature I'm working on. After writing out the commit message I continue to write the code. With the commit message in mind, the scope of the commit is clear.</p>
<p>The concept aligns pretty well with the <a href="https://jamesclear.com/ivy-lee">Ivy Lee productivity method</a>. James Clear, the author of the book <a href="https://amzn.to/2ZLSpMc">Atomic Habits</a><i class="affiliate"></i>, points out what makes the method so effective:</p>
<ul>
<li>It's simple enough to actually work.</li>
<li>It forces you to make a decision.</li>
<li>It removes the friction of starting.</li>
<li>It requires you to single-task.</li>
</ul>
<p>For me the last point is the most powerful: it helps me to focus on one thing at a time because doing anything outside of the scope of the commit message is another task/commit.</p>
<blockquote>
<p>If you commit to nothing, you'll be distracted by everything.
<cite><a href="https://jamesclear.com/">jamesclear.com</a>, <a href="https://jamesclear.com/ivy-lee">The Ivy Lee Method</a></cite></p>
</blockquote>
<h2><a id="ref-benefits" href="#ref-benefits" class="heading-permalink" aria-hidden="true" title="Anchor"></a>Benefits</h2>
<p>Here are some of the benefits I discovered while working with this approach:</p>
<ul>
<li>
<strong>Scope</strong><br/>It helps me to decide what to work on upfront. The commit message defines the scope and holds me accountable. The commit message is like a micro goal.</li>
<li>
<strong>Structure</strong><br/>It helps me to logically group and later review my commits because each commit has a precise goal.</li>
<li>
<strong>Focus</strong><br/>It helps me to remember what I decided to work on.<br/>It also helps me to remember what I was working on in a previous (unfinished or interrupted) session.</li>
</ul>
<h2><a id="ref-setup" href="#ref-setup" class="heading-permalink" aria-hidden="true" title="Anchor"></a>Setup</h2>
<p>Following up on the post by Andrew Feeney I use these two bash functions to incorporate the concept into my daily routine (<a href="#ref-git-cdd">jump to update below</a>):</p>
<div class="code-group">
<div class="code-block">
<span class="filename" role="complementary">.zshrc</span>
<pre><code class="language-bash">function aim() { vim ./COMMIT_MSG; }
</code></pre>
</div>
<div class="code-block sep">
<span class="filename" role="complementary">.zshrc</span>
<pre><code class="language-bash">function fire() { vim ./COMMIT_MSG && ( git commit -F ./COMMIT_MSG $* ) && rm ./COMMIT_MSG; }</code></pre>
</div>
</div>
<h3><a id="ref-additional-setup" href="#ref-additional-setup" class="heading-permalink" aria-hidden="true" title="Anchor"></a>Additional Setup</h3>
<p>In my global <code>.gitignore</code> file I added the following line to not check in the temporary <code>COMMIT_MSG</code> file by accident:</p>
<div class="code-group">
<div class="code-block">
<span class="filename" role="complementary">.gitignore</span>
<pre><code class="language-bash">COMMIT_MSG
</code></pre>
</div>
</div>
<h3><a id="ref-usage" href="#ref-usage" class="heading-permalink" aria-hidden="true" title="Anchor"></a>Usage</h3>
<ol>
<li>Type <code>aim</code> in the Terminal. Write the draft of the commit message in the editor and save the file. This creates a new (temporary) file in the current repository with the name <code>COMMIT_MSG</code>.<br/>To read or modify the commit message type <code>aim</code> again.</li>
<li>Write the code as you'd normally do and <a href="https://git-scm.com/docs/git-add">add/stage</a> the files you'd like to commit.</li>
<li>Type <code>fire</code> in the Terminal. This opens the editor with the pre-written commit message again. Update the commit message if necessary and save the file. The function creates a new commit and deletes the <code>COMMIT_MSG</code> file.</li>
</ol>
<p>The <code>fire</code> function passes through all options. Feel free to append the available <a href="https://git-scm.com/docs/git-commit#_options">commit options</a> provided by Git. For instance, use <code>fire --amend</code> to replace the tip of the current branch by creating a new commit.</p>
<h2><a id="ref-update-git-cdd" href="#ref-update-git-cdd" class="heading-permalink" aria-hidden="true" title="Anchor"></a>Update: Git CDD</h2>
<p><a href="https://alexandergoller.com/">Alexander Goller</a> developed a Git plugin for Linux and macOS to make the commit driven workflow even smoother.<br>
Instead of custom bash functions <a href="https://github.com/alpipego/git-cdd">use the available Git CDD plugin</a>:</p>
<h3><a id="ref-installation" href="#ref-installation" class="heading-permalink" aria-hidden="true" title="Anchor"></a>Installation</h3>
<ol>
<li>Clone the repository:<br>
<code>git clone git@github.com:alpipego/git-cdd.git</code>
</li>
<li>Change into the directory and run the installer:<br>
<code>cd git-cdd &amp;&amp; sudo make install</code>
</li>
</ol>
<h3><a id="ref-usage-1" href="#ref-usage-1" class="heading-permalink" aria-hidden="true" title="Anchor"></a>Usage</h3>
<ol>
<li>Type <code>git cdd aim -m 'Message'</code> in the Terminal.<br>
The command creates a new (temporary) file in the current repository with the name <code>CDD_COMMIT_MSG</code> that holds the commit message.</li>
</ol>
<ul>
<li>Type <code>git cdd status</code> to preview the prepared commit message.</li>
<li>Type <code>git cdd amend</code> to modify the prepared commit message.</li>
<li>Type <code>git cdd forget</code> to delete the prepared commit message.</li>
</ul>
<ol start="2">
<li>Write the code as you'd normally do and <a href="https://git-scm.com/docs/git-add">add/stage</a> the files you'd like to commit.</li>
<li>Type <code>git cdd fire</code> in the Terminal. This opens the editor with the pre-written commit message. Update the message if necessary and save the file. The command creates a new commit and deletes the <code>CDD_COMMIT_MSG</code> file.</li>
</ol>
<h2><a id="ref-whats-next" href="#ref-whats-next" class="heading-permalink" aria-hidden="true" title="Anchor"></a>What's next?</h2>
<p>Give it a try! Start your next task by writing down the goal first and see how it feels. For starters complete the following sentence: <em>If applied, this commit will...</em></p>
]]>
            </summary>
                                    <updated>2019-10-30T15:04:10+01:00</updated>
        </entry>
            <entry>
            <title><![CDATA[Hello World!]]></title>
            <link rel="alternate" href="https://hofmannsven.com/2019/hello-world" />
            <id>https://hofmannsven.com/2019/hello-world</id>
            <author>
                <name><![CDATA[Sven Hofmann]]></name>
            </author>
            <summary type="html">
                <![CDATA[<p>Today I'm introducing the next version of my blog.</p>
<p>It took me a while to get it done and I ended up migrating everything from WordPress to Laravel to fit my needs.</p>
<p>I haven't written a blog post in a few years, so let's sum things up first.</p>
<h2><a id="ref-once-upon-a-time" href="#ref-once-upon-a-time" class="heading-permalink" aria-hidden="true" title="Anchor"></a>Once upon a time...</h2>
<p>In 2007, I launched my very first website. I was just so excited to be online but then I realized that frames and tables aren't particularly brilliant, so I went back to the drawing board.</p>
<p>Five years later, I launched the blog with WordPress as a CMS and wrote a few blog posts about frontend web development, developer tools, conferences and a lot of open source hardware (mostly Arduino and Raspberry Pi). I released a couple of open source packages on <a href="https://github.com/hofmannsven">GitHub</a>, got promoted by <a href="https://www.smashingmagazine.com/">Smashing Magazine</a>, had the incredible <a href="https://jonmasterson.com/">Jon Masterson</a> write a very popular guest post and connected with a ton of awesome people.</p>
<h2><a id="ref-what-a-ride" href="#ref-what-a-ride" class="heading-permalink" aria-hidden="true" title="Anchor"></a>What a ride...</h2>
<p>In 2018 I rebuilt the front page with Laravel, to display who I am and what I do as a freelance developer.</p>
<p>Now, after this journey of over 10 years, I want to revive the blog to document and share my thoughts on design and development. I always loved writing blog posts, and also liked the balance it gave to my day-to-day work.</p>
<h2><a id="ref-setup" href="#ref-setup" class="heading-permalink" aria-hidden="true" title="Anchor"></a>Setup</h2>
<p>The main website and the blog are now built with Laravel. The articles are stored as individual markdown files in the repository. Additional metadata is placed at the top of the files, formatted as YFM (YAML).</p>
<p>This setup makes it easy for me to maintain and migrate the content and does not require any sort of admin panel or database.</p>
<h3><a id="ref-tech-stack" href="#ref-tech-stack" class="heading-permalink" aria-hidden="true" title="Anchor"></a>Tech stack</h3>
<ul>
<li>
<a href="https://laravel.com">Laravel</a>
</li>
<li>
<a href="https://github.com/spatie/yaml-front-matter">Spatie YAML Front Matter</a>
</li>
<li>
<a href="https://github.com/thephpleague/commonmark">League Markdown parser</a>
</li>
<li>
<a href="https://github.com/spatie/laravel-responsecache">Spatie Response Cache</a>
</li>
<li>
<a href="https://www.cloudways.com/en/?id=81957">Cloudways</a><i class="affiliate"></i>
</li>
</ul>
<p>Properly cached, this setup makes the loading time of each individual request basically as fast as a static site.</p>
<p>Designed for speed in the backend and for readability in the frontend, this is a new milestone on this blog's journey.</p>
<h2><a id="ref-who-am-i" href="#ref-who-am-i" class="heading-permalink" aria-hidden="true" title="Anchor"></a>Who am I?</h2>
<p>My name is Sven and I'm a freelance web developer from Germany. I'm involved in the open source community on <a href="https://wordpress.stackexchange.com/users/32946/sven">WordPress Stack Exchange</a> and help with the organization of the <a href="https://tech.wpmeetup-berlin.de/">WordPress Developer Meetup</a> in Berlin. (You can also find me at the PHP and Laravel meetups in Berlin.)</p>
<p>Having a deep relation with open source software and the web, I'm constantly working on new ideas. I'm also interested in interface­ and interaction­ design and like to tinker with new stuff.</p>
<h2><a id="ref-maintenance-and-next-steps" href="#ref-maintenance-and-next-steps" class="heading-permalink" aria-hidden="true" title="Anchor"></a>Maintenance and next steps</h2>
<p>As you might guess, I have many, many ideas to further enhance this blog. I see this as an ongoing project rather than something with a finish line. In the next couple of weeks, I want to add an RSS feed and focus on new content. I will also try to recreate/­rewrite some of my old posts from the archives.</p>
<p>In the meantime, don't hesitate to contact me via email with any feedback or questions, and feel free to connect with me on <a href="https://twitter.com/hofmannsven">Twitter</a>.
You can also follow me on <a href="https://github.com/hofmannsven">GitHub</a> and <a href="https://codepen.io/hofmannsven/">CodePen</a>.</p>
<p>Update: You can now subscribe to the <a href="https://hofmannsven.com/feed">RSS feed</a>.</p>
]]>
            </summary>
                                    <updated>2019-05-25T15:04:10+02:00</updated>
        </entry>
            <entry>
            <title><![CDATA[Arduino Ethernet Network Module]]></title>
            <link rel="alternate" href="https://hofmannsven.com/2013/arduino-ethernet-module" />
            <id>https://hofmannsven.com/2013/arduino-ethernet-module</id>
            <author>
                <name><![CDATA[Sven Hofmann]]></name>
            </author>
            <summary type="html">
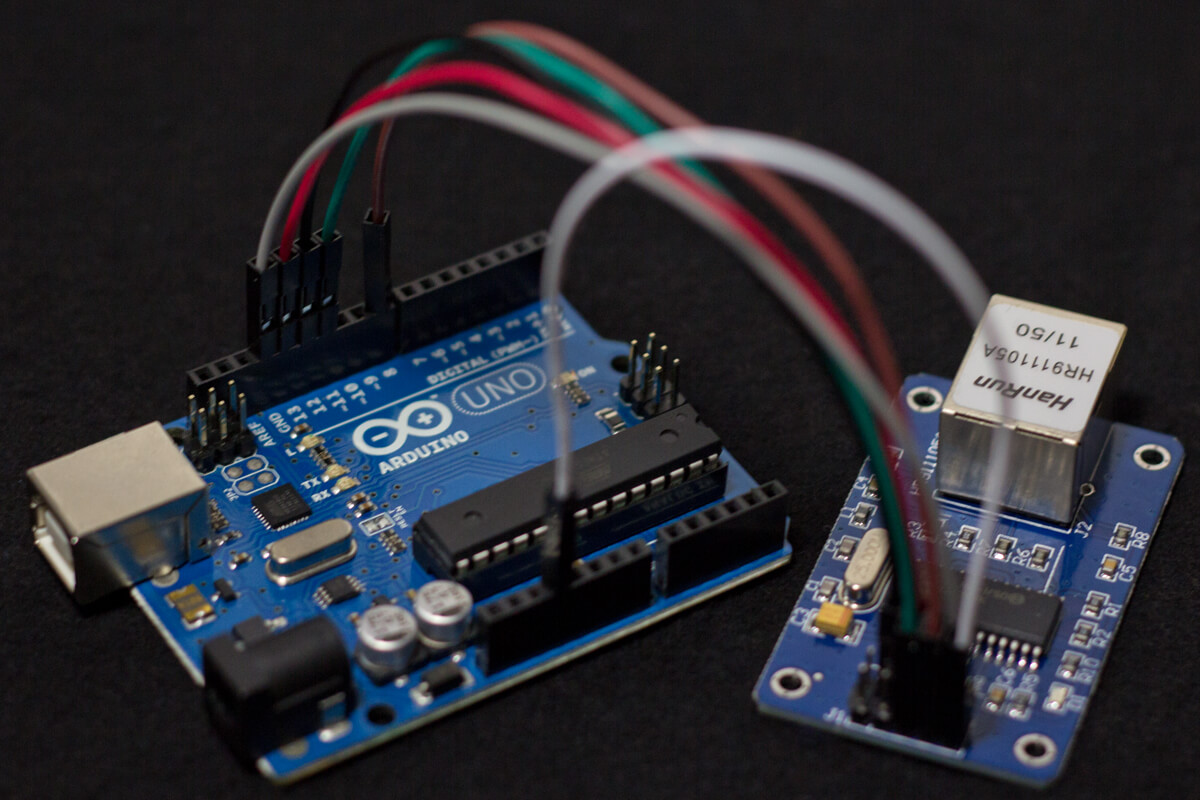
                <![CDATA[<p>Besides the pre-customized solutions like the <a href="https://www.arduino.cc/en/Main/ArduinoBoardEthernet/">Arduino Ethernet Board</a> (retired) or the <a href="https://amzn.to/36BXV5i">Arduino Ethernet Shield</a><i class="affiliate"></i>, there is a favorable alternative to connect an Arduino Board to the internet: the <a href="https://amzn.to/2X7Fe6s">ENC28J60 Ethernet Network Module</a><i class="affiliate"></i>. As Hans Crijns <a href="https://hwstartup.wordpress.com/2013/03/25/how-to-connect-an-arduino-to-the-internet-for-10/">pointed out</a>, it is possible to connect the Ethernet Module with <em>any</em> Arduino (3.3V or 5V) without level shifting. To connect both boards, wire the pins like this:</p>
<table>
  <tr>
    <td><strong>ENC28J60 Module</strong></td>
    <td><strong>Arduino Board</strong></td>
  </tr>
  <tr class="even">
    <td>PIN CS</td>
    <td>PIN 8</td>
  </tr>
  <tr>
    <td>PIN SI</td>
    <td>PIN 11</td>
  </tr>
  <tr class="even">
    <td>PIN SO</td>
    <td>PIN 12</td>
  </tr>
  <tr>
    <td>PIN SCK</td>
    <td>PIN 13</td>
  </tr>
  <tr class="even">
    <td>PIN VCC</td>
    <td>PIN 3.3V</td>
  </tr>
  <tr>
    <td>PIN GND</td>
    <td>PIN GND</td>
  </tr>
</table>
<figure>
  <img src="/storage/arduino-ethernet-module/arduino-uno-with-enc28j60-module.jpg" alt="Arduino Uno with ENC28J60 Ethernet Module" />
  <figcaption>Arduino Uno with ENC28J60 Ethernet Module</figcaption>
</figure>
<h2><a id="ref-ethernet-libraries" href="#ref-ethernet-libraries" class="heading-permalink" aria-hidden="true" title="Anchor"></a>Ethernet Libraries</h2>
<p>Next, download and include the <a href="https://github.com/njh/EtherCard">EtherCard Library</a> from the GitHub repo.</p>
<p>Note: The <a href="https://github.com/thiseldo/EtherShield">EtherShield Library</a> is no longer maintained. Follow <a href="http://blog.thiseldo.co.uk/?p=623">this post</a> on how to migrate from the EtherShield Library to the EtherCard Library.</p>
<h3><a id="ref-debugging" href="#ref-debugging" class="heading-permalink" aria-hidden="true" title="Anchor"></a>Debugging</h3>
<p>Re-check all of your wired connections and run one of the examples from the library above. The Ethernet Module should work out of the box with any type of Arduino Board.</p>
]]>
            </summary>
                                    <updated>2013-06-30T15:04:10+02:00</updated>
        </entry>
            <entry>
            <title><![CDATA[Arduino Ethernet Board]]></title>
            <link rel="alternate" href="https://hofmannsven.com/2012/arduino-ethernet" />
            <id>https://hofmannsven.com/2012/arduino-ethernet</id>
            <author>
                <name><![CDATA[Sven Hofmann]]></name>
            </author>
            <summary type="html">
                <![CDATA[<p>The main microcontroller is based on the ATmega328 microcontroller like the <a href="https://amzn.to/36AchDk">Arduino Uno Board</a><i class="affiliate"></i> itself. There are 14 digital input and, respectively, output pins, 6 analog inputs, a 16 MHz crystal oscillator, an ICSP header, a power jack, a reset button and of course, for the Arduino Ethernet Board, the RJ45 connection.</p>
<p>But the Arduino Ethernet Board especially differs from the other Arduino Boards in one vital way: it does not have an onboard USB-to-serial driver chip. However, you can still use a USB Serial adapter to power the Arduino Ethernet Board as described on the official Arduino website:</p>
<blockquote>
<p>The 6-pin serial programming header is compatible with the <a href="https://www.arduino.cc/en/Main/USBSerial/">USB Serial</a> adapter and also with the FTDI USB cables or with Sparkfun and Adafruit FTDI-style basic USB-to-serial breakout boards. It features support for automatic reset, allowing sketches to be uploaded without pressing the reset button on the board. When plugged into a USB-to-serial adapter, the Arduino Ethernet is powered from the adapter.
<cite><a href="https://www.arduino.cc/">arduino.cc</a>, <a href="https://www.arduino.cc/en/Main/ArduinoBoardEthernet/">Arduino Ethernet Board</a></cite></p>
</blockquote>
<p>Using the Sparkfun Basic Breakout with the Arduino Ethernet Board may require a <a href="https://www.ftdichip.com/Drivers/VCP.htm">FTDI driver</a> that causes the USB device to appear as an additional port available to the computer. Without this special FTDI driver, your Arduino Ethernet Board will be powered, but it is not possible to upload any sketches. This will be immediately apparent because without the FTDI driver there will be no serial port.</p>
<p>Therefore, you can download the latest version of the FTDI driver for FTDI devices on the official website for <a href="https://www.ftdichip.com/Drivers/VCP.htm">Virtual COM Port drivers</a>.</p>
<figure>
  <img src="/storage/arduino-ethernet/arduino-ethernet_lilipad-ftdi.jpg" alt="Arduino Ethernet & LiliPad FTDI Basic Breakout" />
  <figcaption>Arduino Ethernet & LiliPad FTDI Basic Breakout</figcaption>
</figure>
<h2><a id="ref-arduino-ethernet--lilipad-ftdi-basic-breakout" href="#ref-arduino-ethernet--lilipad-ftdi-basic-breakout" class="heading-permalink" aria-hidden="true" title="Anchor"></a>Arduino Ethernet &amp; LiliPad FTDI Basic Breakout</h2>
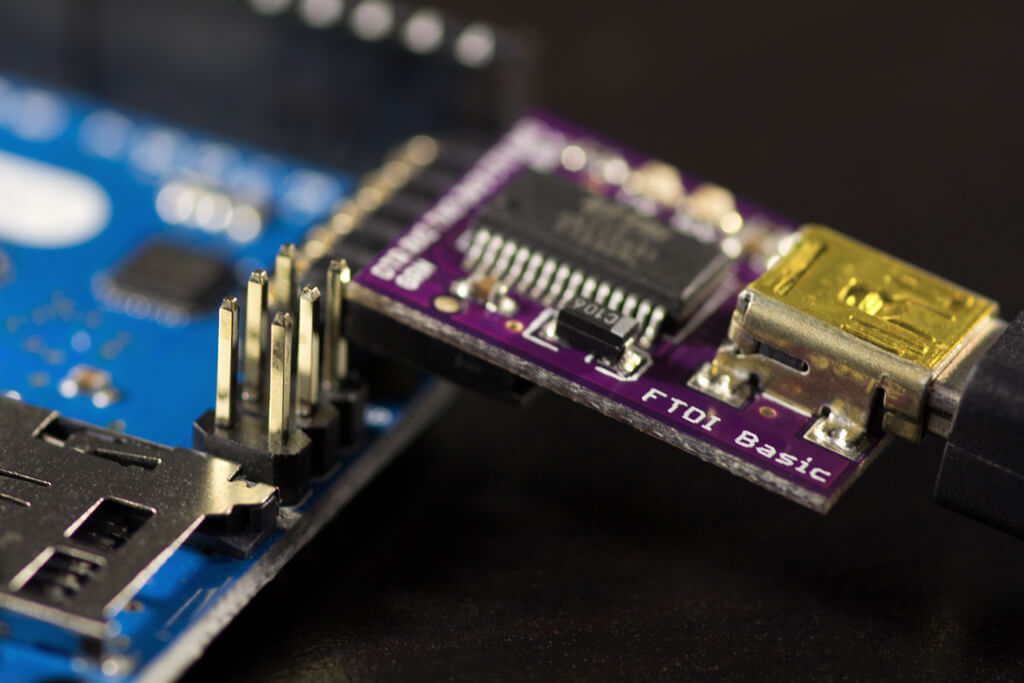
<p>Currently, I'm using the <a href="https://amzn.to/2XJzD5w">LilyPad revision of the FTDI Basics Breakout</a><i class="affiliate"></i> which is pretty much the same as the <a href="https://amzn.to/3dnkXQ9">FTDI Basic Breakout</a><i class="affiliate"></i> (apart from the color and the thickness).</p>
<p>To connect the FTDI Basic Breakout with your computer you can use a <a href="https://amzn.to/2Xe7Qet">USB Mini-B Cable</a><i class="affiliate"></i> (Type A to Mini-B). As mentioned above, it is possible to power the Arduino Ethernet Board from the adapter via the USB connector.</p>
<figure>
  <img src="/storage/arduino-ethernet/arduino-ethernet.jpg" alt="Arduino Ethernet Board" />
  <figcaption>Arduino Ethernet Board</figcaption>
</figure>
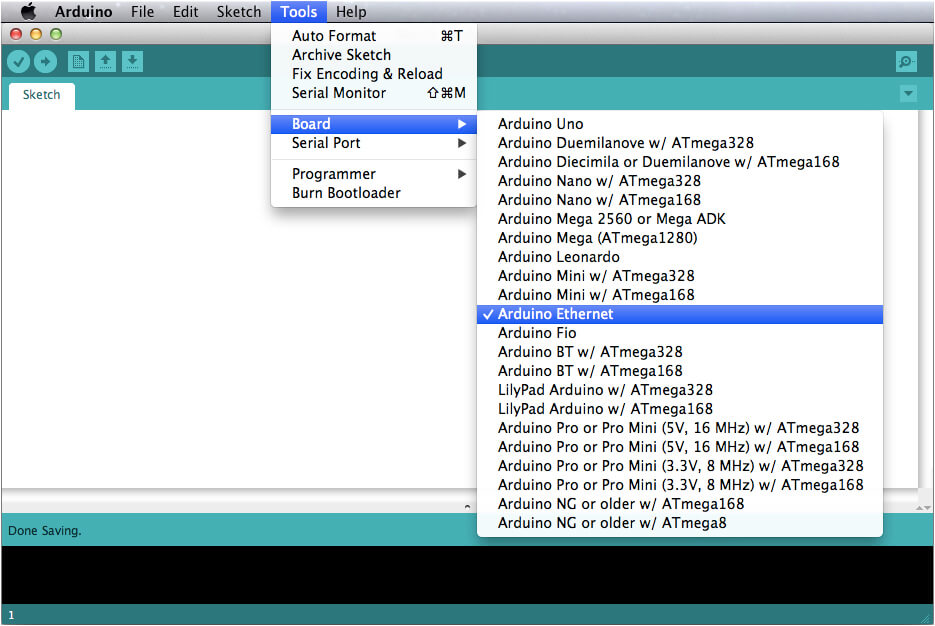
<p>When uploading a sketch, make sure that you have chosen the right Board and Serial Port in your Arduino IDE (Arduino › Tools › Board respectively Serial Port). There is no hidden feature therein, but sometimes it can be difficult to remember all these little things.</p>
<figure>
  <img src="/storage/arduino-ethernet/arduino_tools.jpg" alt="Screenshot of the Arduino IDE Tools Dropdown" />
  <figcaption>Arduino IDE Tools Dropdown</figcaption>
</figure>
]]>
            </summary>
                                    <updated>2012-07-18T15:04:10+02:00</updated>
        </entry>
    </feed>